Everything You Need To Trade ICT Smart Money Concepts
AI Summary
This video introduces fundamental price action and smart money concepts, providing a glossary of terms essential for understanding a comprehensive trading framework. The concepts are categorized into structure, liquidity, ranges, points of interest/entry techniques, and general frameworks.
**Structure:**
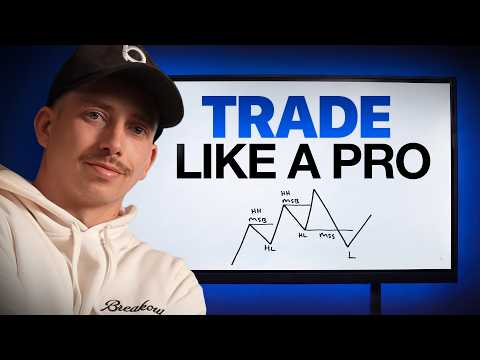
The first concept is **swing highs (SH) and swing lows (SL)**, which are the visual turning points in the market, forming its "skeleton." A swing is confirmed by a three-candle pattern: for a swing low, a low, lower low, and higher low; for a swing high, a high, higher high, and lower high.
Building on swing highs and lows are **higher highs (HH) and higher lows (HL)**, and **lower highs (LH) and lower lows (LL)**. A higher high is a swing high that is higher than the previous one, and a higher low is a swing low that is higher than the previous one. The inverse applies to lower highs and lower lows.
When these concepts are combined, they form **market structure (MS)**. An **uptrend (bullish MS)** is characterized by consecutive higher highs and higher lows. A **downtrend (bearish MS)** is characterized by consecutive lower highs and lower lows. If there's no clear trend, the market is **ranging** or moving sideways.
A **market structure break (MSB)** signifies the continuation of the current market structure or trend. In an uptrend, an MSB occurs when price breaks above a previous higher high, confirming the bullish continuation. In a downtrend, an MSB occurs when price breaks below a previous lower low, confirming bearish continuation.
A **market structure shift (MSS)**, on the other hand, indicates a potential reversal of the current trend. In an uptrend, an MSS occurs when price breaks below a higher low. In a downtrend, an MSS occurs when price breaks above a lower high. An MSS suggests a "potential" reversal, not a guaranteed one.
Finally, **timeframes (TFs)** are crucial. They are divided into **high time frame (HTF)** and **low time frame (LTF)**. While specific timeframes can vary (e.g., weekly/daily as HTF, hourly/15-minute as LTF), the key is to always use a minimum of two. The HTF is used first to determine market bias, structure, and points of interest (POIs). The LTF is then used for entries, risk management, and setting stop losses and targets.
**Liquidity:**
**Liquidity** is simplified to mean "resting orders" in the market, which are primarily limit orders (buy or sell). The perspective adopted is that of an institution or "smart money" that needs liquidity to fill large orders and move the market.
There are two types: **buy side liquidity (BSL)** and **sell side liquidity (SSL)**. BSL consists of buy orders (e.g., stop losses from short positions, breakout long orders) that exist above the market. SSL consists of sell orders (e.g., stop losses from long positions, breakout short orders) that exist below the market. Institutions manipulate price to "sweep" this liquidity, filling their positions before initiating the actual market move.
A **stop hunt** occurs when a trader's stop loss is triggered just before the market moves in the anticipated direction. This is essentially a small-scale liquidity sweep. A **liquidity sweep (lick sweep)** is a broader term for any run on resting orders, often seen as institutions filling their positions by taking out stop losses or breakout orders before a significant move. A **swing failure pattern (SFP)** is a specific type of liquidity sweep.
**Equal highs (EQH) and equal lows (EQL)** are price points where highs or lows are roughly at the same level, forming patterns like double tops/bottoms or triple tops/bottoms. These areas are significant because they accumulate substantial resting orders (liquidity) that institutions often target before initiating a move.
**Internal liquidity (IRL)** and **external liquidity (ERL)** describe the location of liquidity relative to a defined price range. Internal liquidity exists within a range and acts as "pit stops" for price movement. External liquidity exists outside the range, representing "destinations" that price often aims for.
**Ranges:**
The **working range** (sometimes called dealing range) is the current price leg defined by the most recent major swing high and swing low. This range is where all trading analysis and decisions are made, typically identified on the high timeframe.
Within the working range, price exists in either a **premium** or a **discount**. Anything above the 50% midpoint of the range is considered premium (expensive), suitable for looking for shorts or sells. Anything below the 50% midpoint is considered a discount (cheap), suitable for looking for buys or longs.
The 50% midpoint of the range is called **equilibrium (EQ)**. At equilibrium, price is considered balanced, and it's generally advised to avoid trading in the middle, waiting for price to move into a premium or discount for higher probability trades.
**Points of Interest (POIs) and Entry Techniques:**
**Order blocks (OBs)** are specific candles or groups of candles used as POIs for entries. A **bullish OB** is the last down candle before an up move that breaks market structure, serving as an area to look for longs. A **bearish OB** is the last up candle before a down move that breaks market structure, serving as an area to look for shorts.
**Breakers (breaker blocks)** are failed order blocks. A **bullish breaker** is a failed bearish order block that, instead of rejecting price, acts as support, becoming an area to look for longs. A **bearish breaker** is a failed bullish order block that, instead of providing support, acts as resistance, becoming an area to look for shorts.
**Fair value gaps (FVGs)** are three-candle patterns with a gap in price where there was only single-direction movement, indicating momentum. A **bearish FVG** occurs in a downtrend and is an area to look for shorts. A **bullish FVG** occurs in an uptrend and is an area to look for longs.
**Displacement candles** signify strong momentum and institutional sponsorship in a price move. A large, strong move that breaks market structure with clear conviction suggests that the move is genuine and not a fake-out or liquidity sweep. Lack of displacement may hint at a potential reversal.
The **optimal trade entry (OTE)** is a Fibonacci zone, specifically the 61.8%, 70.5% (custom), and 78.6% retracement levels. This "sweet spot" within the discount (for longs) or premium (for shorts) is considered the most optimal area for a pullback to occur before the trend continues.
**Frameworks:**
The **power of three (PO3)**, also known as accumulation, manipulation, distribution (AMD), describes the universal pattern of all price movements. Price first **accumulates** orders, then **manipulates** by sweeping liquidity against the intended direction, and finally **distributes** in the true direction.
The **Judas Swing** is the manipulation phase of the AMD model. It's a fake-out move, often occurring at the start of a trading session, that betrays the actual direction of price for the day, trapping traders on the wrong side before the true move unfolds.
**Kill zones (KZs)** are specific timing windows within trading sessions (e.g., New York Killzone, London Killzone) where high-probability trading opportunities are most likely to occur. These zones help traders focus their attention during peak market activity.
**SMT divergences** occur when two correlated assets (e.g., S&P 500 and NASDAQ, Bitcoin and Ethereum) show a difference in their market structure at key levels. For example, if one asset makes a lower high at resistance while the other makes a higher high, the divergence suggests that the higher high might be a fake-out, providing a clue about the true market direction.
Finally, **risk to reward (RR)** is the ratio of potential profit to potential risk. An asymmetric RR (e.g., 2:1 or 3:1) is highly desirable because it means a trader does not need a high win rate to be profitable. For example, a 3:1 RR requires only a 25% win rate to break even, offering significant leverage for profitability compared to a 1:1 RR which requires a 50% win rate to break even.