Construire une Hypercar de A à Z : les finitions commencent
AI Summary
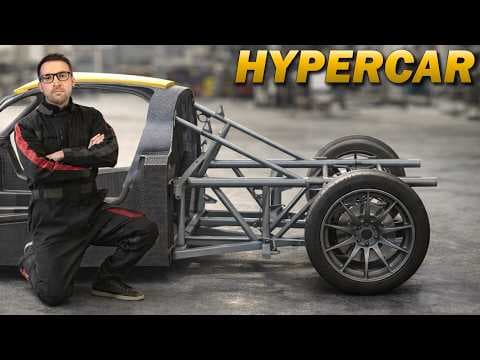
The video details the assembly and preparation of car parts for a project called "Hyper Pilote." The creator begins by showcasing the process of bringing 3D-designed parts together, emphasizing the satisfaction of seeing the car take shape after extensive design work.
A significant portion of the video is dedicated to a "dry fit" assembly, a crucial verification step. This process revealed several issues, including shock absorbers that were too long and wheel bearings that didn't fit. These findings were vital for validating or rejecting parts before the irreversible step of painting.
The creator then explains the necessity of painting all steel parts to prevent rust and improve aesthetics. He mentions that the specific type of paint will be discussed later in the video. While aluminum parts and shock absorbers are finished, the latter require modification due to the length issue identified during the dry fit.
The video then delves into specific challenges encountered with the front and rear subframes. The creator admits to making two mistakes with the front suspension triangles. The first involved an incorrect distance between mounting points, requiring modification and welding. The second, more significant error, concerned a hole that was centered when it should have been offset by 3mm. This mistake, he explains, is unfixable without starting over and will result in a slight modification of the suspension geometry. He emphasizes that making mistakes is part of the process and shares this to be transparent with his audience.
Following these corrections, the triangles are prepared for painting. A key concern is the paint's requirement for baking at 200°C, which could damage the ball joints. To mitigate this, the ball joints are removed. Precision surfaces and threaded holes on the triangles are then meticulously masked to protect them from sandblasting and paint. Custom-made washers were required for some of the larger threaded holes.
The painting process itself is revealed to be powder coating, also known as thermolaquage. This technique involves electrostatically applying powdered paint to the metal part, followed by curing in an oven. The advantages highlighted are the durable, hard, and robust finish. The preparation for powder coating includes sandblasting to remove rust and a corrosion treatment before the powder application and oven curing. The creator notes he previously used this method for a GT40 chassis and was very satisfied. Due to the lack of a suitable oven, this work was outsourced to a professional painter.
The focus then shifts to the rear subframe, described as the most complex mecano-welded part of the car. It was constructed in stages, starting with square tubing for the lower section, chosen for its ease of integration with the car's floor, flat bottom, and diffuser, as well as being easier to work with than round tubing. The upper section uses round tubing for aesthetic preference. The creator recounts a moment where welding distorted the metal, creating a "banana" shape, which was corrected by cutting a slit and re-welding.
The welding of the subframe itself is a meticulous process, using a "point by point" or "chain stitch" welding technique rather than continuous beads. This method, while slower, allows for better control, reduces the risk of perforating the metal, and minimizes distortion. The advantages and disadvantages of chain stitch welding are discussed, including its potential for being less resistant and less watertight compared to continuous welding.
The video then takes a detour into the science of material deformation, explaining elastic and plastic deformation. Elastic deformation is reversible, while plastic deformation is permanent. The concept of the Young's modulus, which dictates a material's stiffness, is introduced with examples like rubber, concrete, glass, and steel. The creator then applies this knowledge to a problem with his subframe, which had warped by approximately 1mm. To correct this, he explains that he needs to induce plastic deformation, meaning he must bend the tube more than 1mm to achieve the desired permanent change. He demonstrates this process using a lever and a measuring tool, eventually achieving the correct alignment.
Next, the creator tackles the fabrication of rear hood pivot mounts, a task he humorously categorizes as procrastination. He then briefly mentions his online store selling t-shirts, highlighting designs that support his work and allow customers to identify as "project supporters."
The subframe is reported to be 95% complete, with only the front mounting plates remaining. These plates will connect to the carbon monocoque and are critical for transmitting engine and braking forces. Their precise placement, using 3D-printed jigs, is emphasized. The subframe is mounted on a welding table, which represents the rear of the carbon monocoque, and checked for symmetry. Another straightening process is undertaken using a hydraulic jack.
The welding of the main mounting plates is described as time-consuming, involving numerous checks and adjustments. A compromise is made regarding the fit of the roll cage mounting plate, where one point of contact is slightly misaligned. This is explained in terms of static versus isostatic support, with a six-point system being inherently unstable. The creator acknowledges this imperfection but deems it the most practical solution.
He then reflects on the challenges of managing deformation during welding, particularly with cantilevered tubes. He suggests that such issues should ideally be addressed during the initial design phase by adding reinforcing bars, rather than attempting to correct them during fabrication.
The video then details the process of finishing the welds, grinding down excess material to ensure a smooth surface for the flat bottom. A problem with a misaligned mounting plate is revisited, and a method involving a bottle jack and his father's assistance is used to apply corrective force, resulting in a partial correction. Shims will be used to account for the remaining 2mm discrepancy.
After the welding is complete, the subframe and triangles are prepared for painting. Excess weld material is removed, and a chamfer is created around the ball joint areas on the triangles to provide more clearance for the shock absorbers.
The parts are then sent for painting, which will involve sandblasting, cleaning, a polyzinc anti-corrosion layer, and finally, powder coating. The chosen color is a light grey with a hint of blue, selected over black to make it easier to spot micro-cracks over time. The triangles and subframes are painted in the same color.
The creator expresses his excitement upon collecting the painted parts, noting the robustness of the paint, which made it difficult to remove bolts. He highlights the success of his masking efforts, with no paint found in the threaded holes. He also mentions the need for significant torque to remove the bolts due to red thread locker.
The video concludes with an update on the project's progress. The carbon monocoque is still being worked on, and the definitive assembly of the subframes is planned. A temporary chassis is envisioned to connect the front and rear subframes, allowing the assembly to resemble a car and for shock absorber testing. The next visible steps will involve the engine peripherals, such as the exhaust, radiator, and tubing. The creator encourages viewers to subscribe, like, share, and comment.